Monday, July 24, 2017

Baked Whole Wheat Tortilla Chip | 焗全麥墨西哥玉米脆片


This snack needs only 15 minutes from prepare to finish.  I used whole wheat tortilla because it is healthier than the plain version.  You can use the same recipe with pita bread and it will come out just as nice and crispy.  I hope you will enjoy it.


My son was taking the tortilla out of the bowl for his afternoon snack.


Baked Whole Wheat Tortilla Chip


Ingredients:
8 pcs Tortilla, whole wheat
1 tablespoon Ground Cinnamon
5 tablespoons Agave Syrup (honey is also fine)
1 tablespoon vegetable Oil
pinch of sea salt


How to make it:
1. Pre-heat the oven to 325 F.

2. In a large bowl, whisk together agave syrup, oil, cinnamon, and salt; set it aside.

3. Stack a few tortillas together.  Cut them into eight wedges with scissors.  Add them into the agave mixture.  Gently rub the mixture with fingers.

4. Place the tortilla pieces on parchment paper without overlapping them.  Bake them for 12-15 minutes, or until they are crispy and the syrup dries up.  Store them in an air-tight container and they can keep up to 1 week.


My son and my husband gave this snack a thumb up.


Monday, July 17, 2017

Young Napa Kimchi | 自醃簡易泡菜


Perhaps the weather is so hot, I crave the flavour of kimchi a lot.  I'm always amazed by the fact that spicy food helps our body sweat to regulate our body temperature.  So back during the summer days in Hong Kong, I often joined the crowds to eat sour and spicy vermicelli.  The excellent vermicelli shops were always humble and were located in alleys of our small streets; however, patrons always found their way in and long queues would always form out into the streets.


My teenage years were filled with memories of squeezing together at a tiny table with my friends or sometimes among strangers, slurping the boiling hot and spicy vermicelli.


Eating kimchi gives me a somewhat similar comfort.  When I miss that sour and spicy flavour, I make kimchi and serve it with some very hot rice.


Young napa kimchi is one of my favourite kimchi.  It is easy to make at home and it doesn't require a lengthy list of ingredients or a long fermentation period.  After I finish the batch, I can eat it as it is or use it to make soup.  I just love it.


Thanks for stopping by.  I hope you will enjoy this recipe.


Young Napa Kimchi


Ingredients:
5 heads Young Napa Cabbage
2 tablespoons Salt


Marinade:
3 tablespoons Korean Red Chili Flakes
4 tablespoon Fish Sauce
2 teaspoons Garlic, minced
2 teaspoons Ginger, minced
1 teaspoon Sugar
1 tablespoon Glutinous Rice Flour


How to make it:
1. Peel off the napa leaves.  Keep the big leaves and save the smaller leaves for some other recipes.  Rinse them a few times to clean off the dirt.  Drain.

2. Rub both sides of each napa leaf with some salt.  Let them stand for 30 minutes.  This process helps to draw out the juice from the napa.


3. Drain the juice.  Rinse off the excess salt with cold water.  Gently squeeze out the excess water.  Set aside.


4. In a small bowl, stir together the glutinous flour with about 1/4 cup of water.  Microwave the mixture for 30 seconds and stir it again.  Return the bowl to the microwave and heat it for another 20-30 seconds.  Stir it again.  The mixture should be gluey.


Pay close attention when microwaving it and try not to overheat it.  Once the mixture turns hard, you need to start over again.  Yet you can always add more time for the mixture to make it more gluey.


5. Combine the marinade with the glutinous rice paste; mix well.  Pour the mixture onto the napa cabbage.  With a hand, gently mix everything together until the napa is evenly coated with the marinade.

6. Place the napa to a glass container and cover it.  Keep it at room temperature for two days for fermentation.  Transfer it to refrigerator and finish it within a week.


Friday, July 14, 2017

Basic Steamed Rice|煮白米飯。甜米茶


A rice cooker is a very essential kitchen appliance for Hong Hong households.  I'd actually never known anyone who didn't have a rice cooker at home if they would ever cook at home.

My mom has always cooked rice in a rice cooker as long as I can remember, but she told me her family used to cook rice in a pot over a wood fire.

"People needed to squat in front of the stove while fanning the fire.  They needed to be very careful not to let the rice burn.  But of course, it happened sometimes," Mom laughed.

Mom grew up in China with my grandparents who I've never met.  They were farmers.  Like many others, they worked a small plot of land from the government to grow rice, sugarcane, and many sorts of vegetables.  After their harvest, they needed to pay a certain portion of rice back to the government as the rent.  "Farming was not a choice.  The government asked you to do it, then you had to do it!" she said.

"We didn't get white rice to eat often.  It was fancy, a luxury,"  She continued.  She explained that the crops often did not grow as well as they expected and they could barely meet their quota.    
"We were not starving like many unlucky people in the street, but yes, we never felt full.  To fill our stomach without eating too much rice, we added sweet potato into the rice and make congee.  It was cheap and filling.  Perhaps I ate sweet potato too much back then and now I rarely want it." Mom said with a light smile.

"So you never had normal white rice until you came to Hong Kong?" I asked.

"I did.  Your grandma would cook white rice during Chinese New Year.  Everyone would have a small bowl.  We would just hold the bowl in our hands, admiring the fluffy white rice and not really wanting to eat it.  When we ate it, we really savoured every grain of it," Mom said.

"Wow, it's not easy," I said, feeling myself very lucky.

"At home, your grandma and your aunt were responsible for cooking, and they didn't like me to hover around the kitchen while they worked so they would ask me to go outside to play with the neighbours.  I didn't need to cook until I met your dad and had you three," Mom continued.

"So you didn't learn how to cook rice the traditional way?" I asked.

"No. Honestly who will still use a pot to cook rice nowadays?  The rice cooker is clean and convenient, and you can forget about it after pressing the start button," Mom said, and started rinsing her rice for the dinner.

For years, I thought my mom was right about the evolution of the rice cooking method.  It wasn't until I went on a camping trip with my husband and my son years later, that I couldn't bring my rice cooker.  It was then that I discovered cooking rice in a pot is a true art.

We were making steamed rice for the sushi at the camp.  Funny to see we didn't even have a table and we needed to prepare food on a cooler.
I know many Canadian campers enjoy bringing hotdogs, burgers, or steaks on their camping trips.  Because these foods are convenient to cook and store.  But for Hongkongers, camping means a pot of instant noodles, a pot of rice with lap cheong (Chinese sausage) or even sushi.  My husband and I didn't want to eat any hot soup during the hot days, so we decided to make sushi.  Sushi needs rice, so I must cook the rice over the flame.

After reading many recipes, I came to the conclusion that a cup of rice to two and a half cups of water was the best recipe.  However, the rice was mushy on the outside and still hard in the core.  We had very unusual sushi for the camping supper that night.

The second time I tried to cook rice in a pot was learning to make pilaf with an Italian chef at culinary school.  I followed all the instructions carefully and was told that the pilaf looked fluffy and tasted great by my classmates.  But the chef disapproved of it.  "You Chinese only know how to cook rice in a rice cooker.  That's why your rice tastes awful, " he said.  Of course, I disagree with his generalization about Chinese and his manner toward me.  But this incident brought up the spark inside me that I wanted to prove him wrong.

A few weeks ago, my rice cooker broke down.  In that moment, not knowing what to do, I recalled a traditional Chinese recipe.  It is different than the many English versions of rice making and I found it is easier to work with.

Also, keep practicing is one of the keys.  I remember for the first few days, my husband and my son seriously complained about the rice.  "They are just not consistent.  Some part is mushy, and some part is hard.  How about I just get a new rice cooker?  Just take it easy." My husband even tried to lure me away from my rice experiments.  I insisted on using the pot.  I really wanted to master this traditional skill.

After a full week of practice, I finally learned the key to making fluffy rice.  Now I can proudly say to my husband that we don't need a new rice cooker.

Thanks for stopping by and reading my lengthy story.  I hope you find this recipe useful.


Basic Steamed Rice
1. Add the desired amount of rice in a pot. The pot should be deep enough that the water will not spill easily.

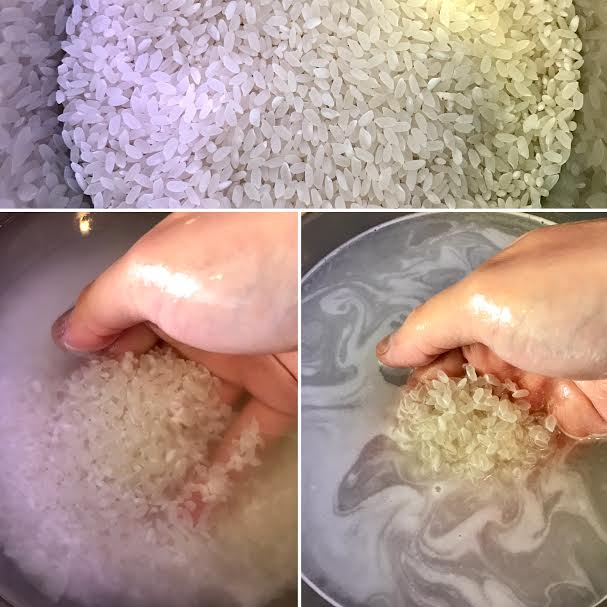
2. Rinse the rice a few times with a few changes of water until the water is clear.  The water won't be totally clear, but it should be clear enough to see through to the rice.

I was watering the radishes with the rinsed water.The first two changes of rinse water is actually packed with nutrition.  You can pour it over plants as extra plant food.


3. Stand a finger in the middle of the pot and fill the pot with water.  The level of the water should be double the level of the rice.


4. Bring the rice to a boil over high heat, uncovered, until the liquid is nearly absorbed; about 4-5 minutes. Stir it once during the process gently to prevent it from sticking.

5. Reduce the heat to low and cover the pot.  Continuously cook the rice for exactly 8 minutes.


6. Remove the rice from the heat and leave it for about 5-10 minutes without opening the lid.  The remaining heat and steam will help the rice prevent from sticking the bottom of the pot. Gently fluff the rice and the rice is ready.

You may find some crispy rice on the bottom (when you didn;t keep it aside for extra 5-10 minutes after it is done).  Don't waste it!  That crisp and hard rice is actually a wonderful ingredient for making a sweet rice tea that is commonly served in Korean restaurants.


Sweet Rice Tea


Ingredients:
Crispy cooked rice in the pot
1.5 cups of water
Sugar to taste


How to make:
1. Burn the rice without water over high heat until the rice turns lightly brown.  Don't over do it or the tea will be too bitter and it's unhealthy for consumption.


2. Add 1-2 cups of water to the pot.  Scrub the rice vigorously with a spoon.  Let the tea boil for another 30 seconds and then remove it from the heat.  Season the tea with sugar to taste.


Pearl Barley Lemon Drink | 檸檬薏米水


Peral barley lemon drink is a common beverage in Hong Kong.  During the fiercely hot summer time, many moms will make this lemony drink for their family to cool off their bodies.

In this drink, we combine two different types of barley, the raw barley and the toasted barley.   Since we believe every food contains different elements like "yin and yang" or "cold and hot", we consider raw barley to be "cold" and roasted barley to be "hot".  By combining the two barley together, we can balance the extreme elements that benefits our bodies.


The raw barely is on the left, and the roasted barley is on the right.


Pearl Barley Lemon Drink
檸檬薏米水


Ingredients:
1/4 cup Raw Barely
1/2 cup Roasted Barely
4 tablespoons Sugar
1/4 wedge of Lemon


How to make it:
1. Bring it to a boil.  Add raw barely and roasted barely.  Reduce the heat to medium and continuously boil it for 25 minutes.  Turn off the heat.  Squeeze in the lemon juice and season it with sugar.


Mango Coconut Sago | 芒果椰汁西米露


Having grown up in Hong Kong, I was lucky enough to be exposed to many different cuisines locally and while travelling within Asia to search for food.  Food is a big part of our life!  Hong Kong people love Japanese, Taiwanese, Thai, Indian, Indonesian, Korean, Singaporean, Filipino food...the list is pretty long.  We don't mind to pack a lunch for work everyday to save money for a "food trip" to nearby countries.

We enjoy exotic food and always look for something new to try; the more exotic the food, the more we crave for it.  The ingredients don't necessarily have to be expensive or rare.  In fact, most Hong Kong people love cheap or reasonable snacks or meals, like pickled chicken feet, marinated chicken wing tips, and seared pig livers on noodles.  

Other than eating out, many people also enjoy cooking at home for their family and friends.  It is common to see school girls or office ladies bring their newly successful homemade dessert or snacks to share with their best friends, lovers, or colleagues.  I know a few friends of mine who fell in love with their wives because of their warm, skillful, and generous cooking.  Cooking is generally considered a virtue although it's been becoming less important as generations pass.

Mango coconut sago is a Filipino dessert with a twist of Hong Kong flavour.  I don't know many people who don't enjoy eating this summer dessert.  The sweet yet tangy mango chunks go perfectly with the rich and creamy coconut milk, along with the slightly chewy sago.


Left side - tinted sago

Sago is a starchy product that is extracted from the stem of the sago palm tree.  It is different than tapioca which comes from cassava starch.  Sago is tasteless and odourless.  You can find commercially whitened sago or tinted sago widely available in most Asian supermarkets.

In Hong Kong, I always mixed coconut cream and water for this dessert.  Since I couldn't find coconut cream here, I used coconut milk instead.  AROY-D coconut milk is the brand I recommend; it is relatively good quality for its price.

Thanks for stopping by.  I hope you enjoy this recipe.


Mango Coconut Sago
芒果椰汁西米露


Ingredients: yields 4 portions
2 Mangoes, ripe
1/2 cup Sago
6 cups of Water
1/2 cup Rock Sugar
1 can Coconut Milk, large


How to make it:
1. Bring the 6 cups of water to a boil over high heat.  Once boiling, pour in the sago.  Let the water come back to a boil and then reduce the heat to medium-low.  With the lid on, continuously boil the Sago until it is translucent, about 15 minutes.  Remove the pot from the heat and leave it for 10 minutes.  (Read the Reminder 1).

2. Drain the cooked sago and cool it down immediately under runny water.  Gently rinse them until most of the starch is gone.  Transfer it to a big bowl; set aside.


3. In a pot, add the coconut milk and rock sugar.  Gently heat it up over medium heat until the rock sugar is dissolved.  There is no need to totally boil the coconut milk.  Remove the mixture from the heat.  Once it has cooled to touchable temperature, transfer it to a blender.  Set it aside.  (Read the reminder 2).

4. Peel off the mango skins, Cut both sides of flesh from each mango pit and save them to make mango cubes.  Scrape off the leftover flesh around the pits to the coconut milk, and then process it in the blender until smooth.  Pour the coconut mixture into the sago. 

5. To make mango cubes, score the mangoes without cutting through their skins.  Scoop out the flesh with a spoon.

6. When the sago mixture is no longer warm, gently mix in the mango.  Transfer the dessert to the fridge until chilled.  Enjoy it within three days.


Reminder:
*1. The sago is considered done even there is tiny white dots in the centre.  Through further cooking process, the dots should be gone.  Overcooking the sago will result in a gluey mess.  Also, a lack of water causes scorching on the bottom and creates a gluey mess. Adjust the amount of the water as needed.

*2. If you don't want to use too much coconut milk, cut the amount in half and replace the rest with water.


Saturday, July 8, 2017

Summer Shirataki Noodles Salad | 夏日蒟蒻涼麵


The school is finished and my son started his first summer camp.  It is a nature learning camp to help children experience wild animals' habitats and allow the children to get dirty.  My son loves it.  He has a great time time climbing trees, playing with mud, building shelter, and having a campfire with his new friends there.

 After the long hot day, my son prefers a light and simple dinner.  I am also not feeling up to cooking in front of the heat.  So making some cold shirataki noodles is a good idea.


Shirataki noodles are made from the tubers of the konjac plant through a drying and grounding process.  It's high in soluble fibre with little calories so it's considered as a healthy diet food and pasta substitute.  You can find shirataki in brown or white colour.  White shirataki is the original and the brown one has added seaweed.  Brown shirataki is firmer and slightly richer in taste. 

My whole family loves the smooth and chewy texture of shirataki noodles.  My son's eyes lit up when he saw it.  "I remember this.  I like this stuff. I am going to eat it all."  Then, he slurped up a forkful of shirataki.

Since shirataki noodles have almost no taste you can flavour them with any sauce or dressing according to your preference.  I use both white and brown shirataki, but I like to use the white for a creamy dessert and the brown for a savoury dinner.

The recipe below is one of my simple and delicious ways to prepare cold shirataki for a hot summer night.  

Thanks for stopping by.  I hope you enjoy this recipe.


Summer Shirataki Noodles Salad
夏日蒟蒻涼麵


Ingredients for topping:
2 packs Shirataki Noodles
1 pack Enoki Mushrooms
3 Eggs
20 Shrimps
1/2 cucumber
2 Carrots
Oil (for frying eggs)


Ingredients for dressing:
4 tablespoons Rice Vinegar
5 tablespoons Light Soy Sauce
3 tablespoons Honey
4 tablespoons White Sesame, toasted


DIRTECTION:
1. Deshell and devein the shrimp.  Rinse it under cold water; set aside.

2. Bring a pot of water to a boil over high heat.  Add the shrimp.  Cook until the shrimp change colour and curl up; about 2 minutes.  Drain the shrimp and allow it to cool.

*You can cook the shells in the cooking liquid and save it as seafood broth for other recipes. 


3. Quarter the cucumber lengthwise.  Deseed it and than slice it into 4 cm sticks with its skin on; set aside.

4. Cut the carrot into the same size as the cucumber with its skin on.  Set aside.

5. Cut and discard the lower stems of the enoki mushrooms.  Remove any dirt or debris.  Set aside.

6. To make scrambled eggs, heat up 2 tablespoons of oil in a pan over medium-high heat.  Beat the eggs together, and then add it into the pan.  Quickly stir the egg until it turns bright yellow and set aside.  Transfer the eggs to a plate.


7. In a bowl, combine all the dressing ingredients.  Mix well and set it aside.


8. To serve, add a portion of shirataki noodles in the centre of the plate.  Add the ingredients around it.  Last, season it with the dressing and serve immediately.  It can be kept in the fridge up to two days.


Tuesday, July 4, 2017

Spruce Pine tips and recipes | 嫩松葉食譜


Around early May until mid June, the young shoots of the pine and spruce start to come out from their brownish papery shields.  These bright green young shoots are edible, tender, lemony-pine like, and rich in Vitamin C.   

My family and I were walking in the woods, looking for some other edible plants when we spotted a huge spruce tree that filled with these yummy tips.  Many tips had just emerged, while many others were still waiting for their time.


Young spruce tips are always best collected when they just come out from their papery casings.  After the tips become bigger and the colour turns deeper green, they lose the delicate citrus flavour and I will not collect them anymore.  After a few taste-tests to make sure we found a good tree, we started to collect the tips.

These tips are actually the young shoots of the tree and they will turn into branches and needles once mature.  So we paid careful attention not to accidentally over harvest the tips from the same branch or from the same area.


My son said he had to give each spruce tip a "taste test".


My son wasn't in the mood to stop and watch his mommy pick the spruce tips, which seemed to take forever.  He wanted to keep walking.  He stared at me while I chewed my second spruce tip.


"Do you want to try some? It's delicious." I handed him a tip.  He shook his head.  Frankly speaking, my son often hesitates to try wild edible plants although we forage all the time.  Perhaps many wild plants are rather pungent or bitter for his taste.  My husband and I just have to try different ways to teach him to enjoy the gift from the wild.

"Are you sure? It taste like spring." I nibbled again on the tip and handed it to my son.  "What does spring taste like?" He said curiously.  "Kind of like lemon or some type of citrus, but with the taste of pine," I answered.

He picked a green tip from the tree and took a teeny-tiny bite.  "Mmm, it's so yummy!" He smiled and slowly savoured the rest of the tip.  "Can I have another one?" he asked.  Since I wasn't sure how many pine tips a kid should have per day, I told him he could only have one or two.  Later, I saw him sneaking a few more into his mouth on the other side of the tree.  Well, it's really hard to stop him when there were thousands of tips dangling on the branches in front him.  So, we moved on.


Last week when we visited my in-laws, we found their spruce tree was also filled with the young tips.  My son immediately picked one and introduced it to his grandma and grandpa.


"It's packed with Vitamin C.  You will just need to eat two pine tips to fill your need every day!" my son said, announcing his new find.  Although my in-laws are not wild-edible enthusiasts, they nibbled a little.  "Oh yeah, it does taste a little like citrus, " Grandpa said.

"Just eat two, okay?" my boy said, with a very proud smile on his face.

Thanks for stopping by.  I hope you will enjoy these recipes.


Spruce Tip Sea Salt


INGREDIENTS:
1/2 cup Spruce Tips
1.5 cups Sea Salt


DIRECTION:
1. Rinse the spruce tips with cold water; pat dry.

2. Finely chop the pine tips with a knife.

3. Mix the sea salt with the pine tips and stir until combined.  Loosely cover it with plastic wrap and allow it to completely air-dry; stirring it once every day to even out the drying.  Store it in an air-tight container and it can be kept up to three months.

Pine salt is good to be used on white fish, frittata, or roasted root vegetables.


Spruce Tip Mayonnaise 


INGREDIENTS:
1 cup Japanese Mayonnaise
10 Pine Tips
2 tablespoons Lemon Juice
1 tablespoon Honey


DIRECTION:

1. Rinse the pine tips in cold water; pat dry.

2. Finely chop the pine tips.  Mix it with the rest of the ingredients.  Chill it before using it.  Can be stored in refrigerator for two days.

Spruce tip mayonnaise is delicious as vegetable dip, or served with white fish.


Spruce Tip Sugar


INGREDIENTS:
1/3 cup Spruce Tips
1.5 cup Sugar


DIRECTION:
1. Rinse the spruce tips with cold water; pat dry,

2. Finely chop the spruce tips.  Mix it with the sugar.  Cover the mixture loosely with plastic wrap.  Allow it to completely air-dry; stirring it once everyday.  Store it in an air-tight container and it can be kept up for three months.

Spruce tip sugar is perfect as an additional flavour for cookies and drinks.


Mitarashi Tofu Dango (Tofu Glutinous Balls with Sweet-Salty Sauce) | 豆腐丸子


Tofu dango is a Japanese dumpling snack made of tofu and mochiko, a type of glutinous short grain Japanese rice flour.

Dango is chewy and soft with a depth of soy flavour.  When served, three or four dango are often put on a skewer and coated with the sweet-salty sauce, mitarashi.  

The first time when I ate dango was in Japan travelling with my family.  There was a small store selling concessions and tea for the tours at the park, and I saw a man speedily rolling a big piece of dough into many small balls and into a boiling water pot.  An old lady beside him scooped up the floating rice balls with a strainer.  Then she started to skewer those piping hot dumplings.  I still remember how crazily exited I was when I finally got my first chance to eat the "Japanese dumpling".  Since I spoke no Japanese, I used my body language to place my order for the snack.  The old lady held a few skewered dumplings in hand and dipped them into a pot of "brownish sauce" (as I called it back then).  That was the mitarashi dango.  The flavour was awesomely comforting, and I fell in love with this sweet and salty snack since then.


For me, dango is very similar to the Chinese "tang yuen".  Both snacks are soft, chewy, and can be served sweet or savoury, and they are also made of glutinous short grain rice flour.  The big difference was that dango is using Japanese rice while "tang yuen" uses Chinese rice.

At home, I use both in my dango making, depending on which one is on hand.  Although mochiko can be easily found in many Asian markets, it is not as widely available as Chinese glutinous rice flour.  Also, mochiko is more pricy.  However, the dumplings that are made of mochiko are finer and softer in texture, which makes the dessert more delicate and I enjoy it more.

To use tofu instead of water to form the dough which can increase the nutritional value while adding extra flavour for the dumplings.  You can use silken or firm tofu to make this dessert, but the silken version will for sure be the winner when comparing texture.

Thanks for stopping by.  I hope you enjoy this recipe.


Tofu Dango
豆腐丸子


INGREDIENTS:
90 gram Silken Tofu
120 gram Glutinous Flour


Mitarashi Sauce:
4 tablespoons Soy Sauce
2 tablespoons Mirin
2 tablespoons Sugar
1 tablespoon Water
1 teaspoon Corn Starch


DIRECTION:
1. In a mixing bowl, mash the tofu until fine with a hand.

2. Add flour, a little at a time, mixing it with the tofu and form it into a dough.  The texture of the dough should resemble the softness of the earlobes.  Add more flour or tofu to adjust the texture if needed.


3. Bring a pot of water to a rolling boil over high heat.  Roll the dough into equal sized balls.  Add the balls to the water.  Boil them until they float to the surface which indicates that they are cooked through.

4. Scoop out the dumplings and quickly transfer them into a bowl of cold water to stop the cooking process.


5. Put three or four dumplings on a skewer and place them on a serving place.  Set aside.


6. To make the mitarashi sauce, combine soy sauce, sugar, and mirin in a saucepan.  Gently heat it up over low heat.

7. Combine cornstarch with a tablespoon of water.  Then whisk it into the soy sauce mixture.  Continuously stir the sauce until it thickens.  Use a spoon to draw a line in the saucepan, if the sauce separates it is done.  Remove it from the heat and spoon it over the dumplings immediately.


Roasted Butternut Squash Soup | 烤葫蘆南瓜湯

Compare to the non-roasted version, roasted butternut squash instead brings a tremendous different in the flavour.  The caramelized s...