Showing posts with label food. Show all posts

Tuesday, January 23, 2018

Braised Shiitake Mushrooms in Oyster Sauce | 蠔油炆冬菇生菜


INGREDIENTS:
15-18 pcs Dried Shiitake Mushrooms
1 head Iceberg
3 Garlic Cloves
1/4 cup Vegan Oyster Sauce
Water

材料:
15-18 隻   冬菇
1 頭   生菜
3 瓣   蒜頭
1/4 杯   素蠔油

DIRECTION:

Monday, July 17, 2017

Young Napa Kimchi | 自醃簡易泡菜


Perhaps the weather is so hot, I crave the flavour of kimchi a lot.  I'm always amazed by the fact that spicy food helps our body sweat to regulate our body temperature.  So back during the summer days in Hong Kong, I often joined the crowds to eat sour and spicy vermicelli.  The excellent vermicelli shops were always humble and were located in alleys of our small streets; however, patrons always found their way in and long queues would always form out into the streets.


My teenage years were filled with memories of squeezing together at a tiny table with my friends or sometimes among strangers, slurping the boiling hot and spicy vermicelli.


Eating kimchi gives me a somewhat similar comfort.  When I miss that sour and spicy flavour, I make kimchi and serve it with some very hot rice.


Young napa kimchi is one of my favourite kimchi.  It is easy to make at home and it doesn't require a lengthy list of ingredients or a long fermentation period.  After I finish the batch, I can eat it as it is or use it to make soup.  I just love it.


Thanks for stopping by.  I hope you will enjoy this recipe.


Young Napa Kimchi


Ingredients:
5 heads Young Napa Cabbage
2 tablespoons Salt


Marinade:
3 tablespoons Korean Red Chili Flakes
4 tablespoon Fish Sauce
2 teaspoons Garlic, minced
2 teaspoons Ginger, minced
1 teaspoon Sugar
1 tablespoon Glutinous Rice Flour


How to make it:
1. Peel off the napa leaves.  Keep the big leaves and save the smaller leaves for some other recipes.  Rinse them a few times to clean off the dirt.  Drain.

2. Rub both sides of each napa leaf with some salt.  Let them stand for 30 minutes.  This process helps to draw out the juice from the napa.


3. Drain the juice.  Rinse off the excess salt with cold water.  Gently squeeze out the excess water.  Set aside.


4. In a small bowl, stir together the glutinous flour with about 1/4 cup of water.  Microwave the mixture for 30 seconds and stir it again.  Return the bowl to the microwave and heat it for another 20-30 seconds.  Stir it again.  The mixture should be gluey.


Pay close attention when microwaving it and try not to overheat it.  Once the mixture turns hard, you need to start over again.  Yet you can always add more time for the mixture to make it more gluey.


5. Combine the marinade with the glutinous rice paste; mix well.  Pour the mixture onto the napa cabbage.  With a hand, gently mix everything together until the napa is evenly coated with the marinade.

6. Place the napa to a glass container and cover it.  Keep it at room temperature for two days for fermentation.  Transfer it to refrigerator and finish it within a week.


Tuesday, July 4, 2017

Mitarashi Tofu Dango (Tofu Glutinous Balls with Sweet-Salty Sauce) | 豆腐丸子


Tofu dango is a Japanese dumpling snack made of tofu and mochiko, a type of glutinous short grain Japanese rice flour.

Dango is chewy and soft with a depth of soy flavour.  When served, three or four dango are often put on a skewer and coated with the sweet-salty sauce, mitarashi.  

The first time when I ate dango was in Japan travelling with my family.  There was a small store selling concessions and tea for the tours at the park, and I saw a man speedily rolling a big piece of dough into many small balls and into a boiling water pot.  An old lady beside him scooped up the floating rice balls with a strainer.  Then she started to skewer those piping hot dumplings.  I still remember how crazily exited I was when I finally got my first chance to eat the "Japanese dumpling".  Since I spoke no Japanese, I used my body language to place my order for the snack.  The old lady held a few skewered dumplings in hand and dipped them into a pot of "brownish sauce" (as I called it back then).  That was the mitarashi dango.  The flavour was awesomely comforting, and I fell in love with this sweet and salty snack since then.


For me, dango is very similar to the Chinese "tang yuen".  Both snacks are soft, chewy, and can be served sweet or savoury, and they are also made of glutinous short grain rice flour.  The big difference was that dango is using Japanese rice while "tang yuen" uses Chinese rice.

At home, I use both in my dango making, depending on which one is on hand.  Although mochiko can be easily found in many Asian markets, it is not as widely available as Chinese glutinous rice flour.  Also, mochiko is more pricy.  However, the dumplings that are made of mochiko are finer and softer in texture, which makes the dessert more delicate and I enjoy it more.

To use tofu instead of water to form the dough which can increase the nutritional value while adding extra flavour for the dumplings.  You can use silken or firm tofu to make this dessert, but the silken version will for sure be the winner when comparing texture.

Thanks for stopping by.  I hope you enjoy this recipe.


Tofu Dango
豆腐丸子


INGREDIENTS:
90 gram Silken Tofu
120 gram Glutinous Flour
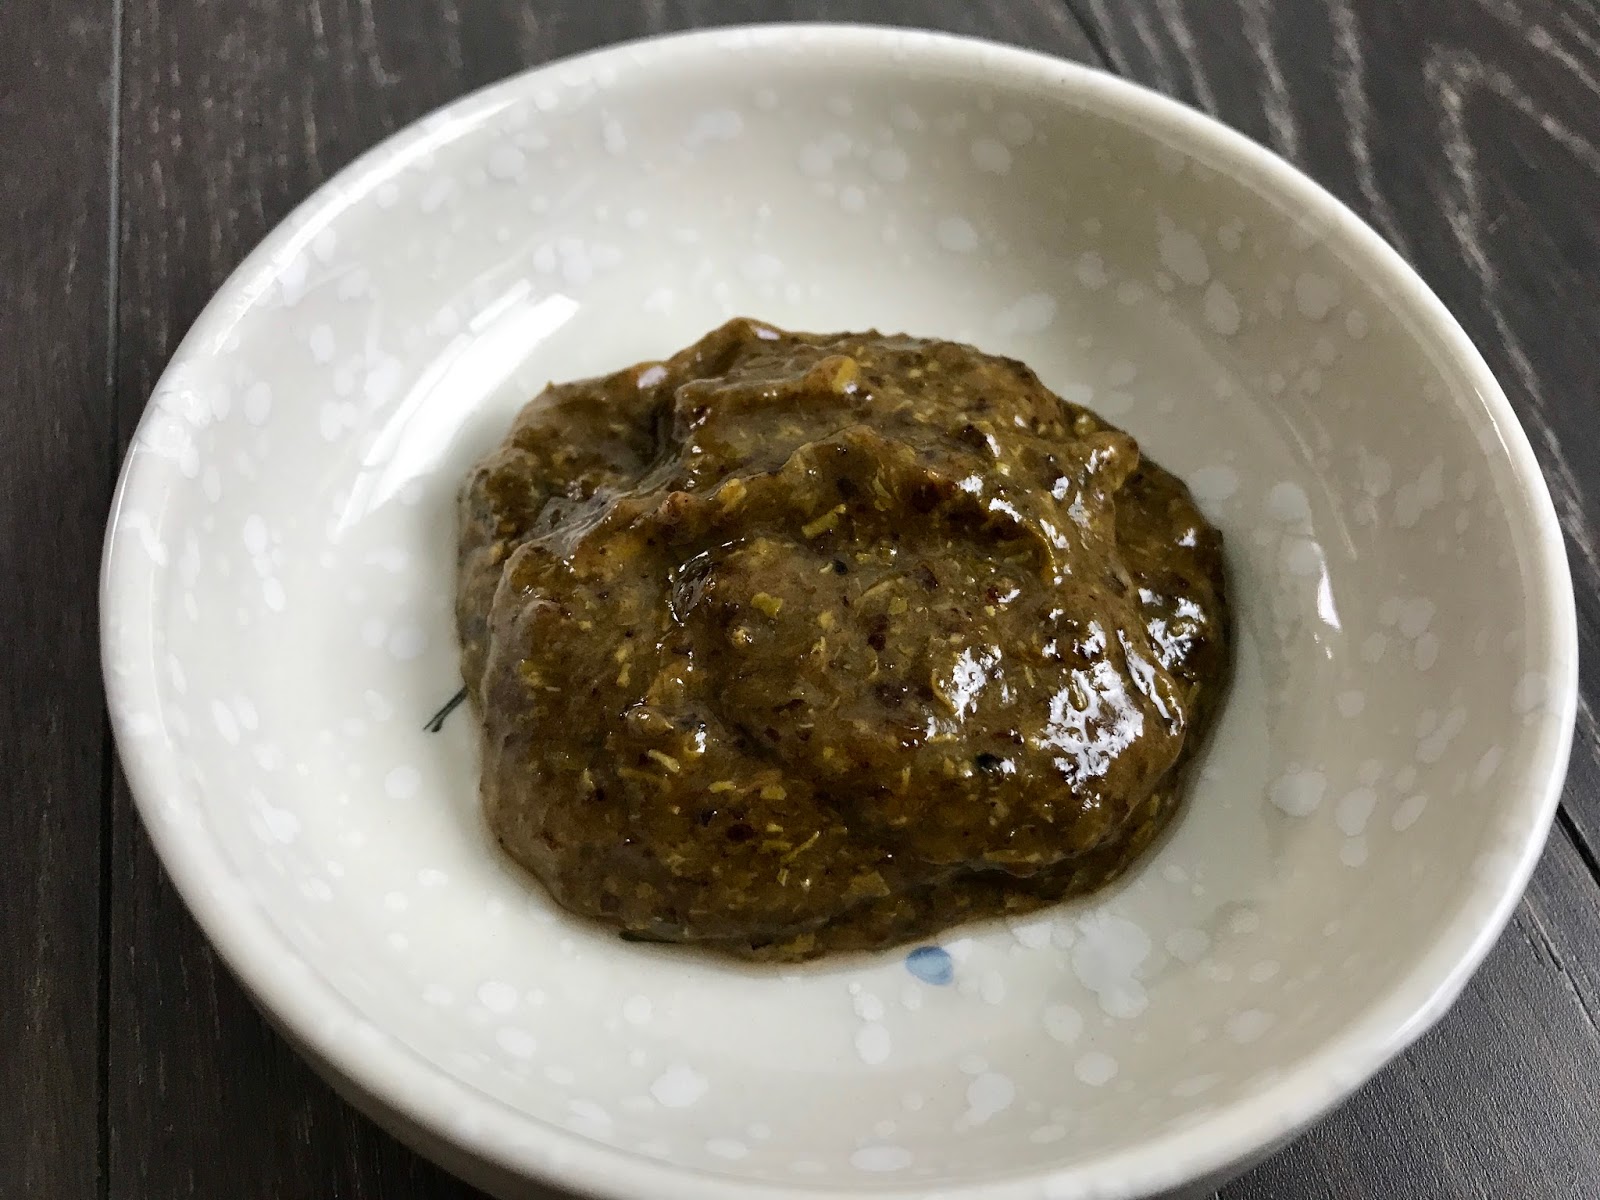

Mitarashi Sauce:
4 tablespoons Soy Sauce
2 tablespoons Mirin
2 tablespoons Sugar
1 tablespoon Water
1 teaspoon Corn Starch


DIRECTION:
1. In a mixing bowl, mash the tofu until fine with a hand.

2. Add flour, a little at a time, mixing it with the tofu and form it into a dough.  The texture of the dough should resemble the softness of the earlobes.  Add more flour or tofu to adjust the texture if needed.


3. Bring a pot of water to a rolling boil over high heat.  Roll the dough into equal sized balls.  Add the balls to the water.  Boil them until they float to the surface which indicates that they are cooked through.

4. Scoop out the dumplings and quickly transfer them into a bowl of cold water to stop the cooking process.


5. Put three or four dumplings on a skewer and place them on a serving place.  Set aside.


6. To make the mitarashi sauce, combine soy sauce, sugar, and mirin in a saucepan.  Gently heat it up over low heat.

7. Combine cornstarch with a tablespoon of water.  Then whisk it into the soy sauce mixture.  Continuously stir the sauce until it thickens.  Use a spoon to draw a line in the saucepan, if the sauce separates it is done.  Remove it from the heat and spoon it over the dumplings immediately.


Saturday, April 29, 2017

Japanese Knotweed - wild edible


Have you seen Japanese knotweed before?  It is a beautiful plant that may remind you of bamboo.  I think it was the reason why knotweed was introduced to North America from Japan as an ornamental plant long time ago.

In Japan and China, people are more focused on the medical benefits of the knotweed.  Knotweed contains a high amount of resveratrol, a potent antioxidant compound that can also be found in red grape skin or blueberry.  I'm not an expert on this one so I can't tell you much about how this organic compound works in our body.

For me, knotweed is a gift from nature and it tastes wonderful.  It has the tangy and subtle sweet flavour that resembles rhubarb.


Knotweed on the left, and horsetail grass on the right

Before I came across Japanese knotweed, I more often encountered horsetail grass, a species that looks very much like knotweed.  However, you can distinguish them very easily. 

In spring, Japanese knotweed is plump and round, and has reddish purple dots.  The leaves are heart shaped with two subtle purple lines on each.  Horsetail has no spots on the stem, and it has papery texture.  Both species are bamboo-like and invasive; however, knotweed is edible and the other is not.


A young leaf of the Japanese knotweed.  The two lines will subside when the leaf grows more mature.


Knotweed

Young knotweed usually starts to come out in early April.  This fast growing species can grow nearly 10 cm each day up to 3 meters in height, and the root can spread up to 10 feet in depth.  The root system is very vigorous and can even break through concrete, causing much damage in houses or roads.  A strong reason why our Government wants to get rid of it and puts it under the Invasive Special Act.  I think our government has done a very good job because I rarely see knotweed around to forage anymore.
  
When foraging knotweed, we look for the young shoots that are easy to break off and are no more than 6 inches tall. Past this stage, the plants will start to become woody and will no longer be good for consumption.

Since Japanese knotweed tastes tangy and sweet, I used it to make some knotweed jam for the yogurt dessert.


Japanese Knotweed Jam

Ingredients:
1/2 cup Young Knotweed Shoots
3 tablespoons Sugar
3 tablespoons Rum Raisin

I infused the raisin three years ago and I only use it for special dessert.  If you don't have some on hand, just use raisin and a splash of rum.  Or just omit the rum.


How to make:
1. Rinse the knotweed carefully; cut it into bite sized pieces.

2. In a non-stick pot, add the knotweed and a cup of water.  Bring it to a boil and cook continuously until the knotweed is totally soft and the liquid has almost evaporated. It takes about 5 minutes.

3. Pour the cooked knotweed in a blender, including the cooking liquid.  Add raisin.  Pulse until the mixture incorporates.


Japanese knotweed Jam


Da, da, da, da~

It is the dessert for tonight.  I must say it feels great to eat the food I forage or grow with my own hands.  There is a bond between the nature and the me inside.


Knotweed jam on greek yogurt, plus some hemp seeds and bean cracker for the garnish.


Tuesday, April 25, 2017

Preserved Meyer Lemon | 醃梅爾檸檬


To preserve your own food is one big step towards an urban homestead.  It is a way to re-learn and practice a basic life style.  Living in the city, we have little space to grow our own vegetables, but my family and I are trying as much as possible to eat what is in season and preserve the bounty for later.  Making preserved lemon is my annual project.  I will preserve just enough of it to last until the next batch of lemons is ready.  

Comparing the regular lemon to the Meyer lemon, I would say the flavour of the Meyer lemon is more profound and less pungent.  It tastes like a combination of lemon and orange.  Salted Meyer lemon makes a wonderful citrus seasoning that can be used in many meat dishes, and goes especially well with pork and seafood.


The high season for Meyer lemons begins in November to March

Preserved Meyer Lemon  | 醃梅爾檸檬

INGREDIENTS:

4 Meyer Lemons

1/2 cup Sea Salt

A clean air-tight bottle


DIRECTION:

1. Wash the lemons carefully with a soft brush; dry them.

2. Cut them into quarters.

3. In the clean bottle, add a thin layer of salt and then add a layer of Meyer lemons.  Alternately add the salt and the lemons until the bottle is full. Seal the bottle and keep it in the fridge for at least three weeks.  You can start to use this preserve after three weeks, but I found the best flavour develops only after the full year of preserve and when the lemon rinds get really soft.


This recipe is one I reach for preserved Meyer lemon most often.


Steamed Pomfret with Meyer Lemon

(Ingredients):

1 Pomfret, gutted

2 wedges of Preserved Meyer Lemon


DIRECTION:
  1. Roughly chop the lemon; apply it on both sides of the fish and inside the fish’s belly. Place the fish on a plate and leave it on the counter to marinate for 15 minutes.
  2. Meanwhile, bring a pot of water to a boil and add a rack in the pot. Place the fish on the rack and steam on high heat for about 12–14 minutes (depends on the size of the fish). Drizzle some light soy sauce to add extra flavour if you want.


Roasted Butternut Squash Soup | 烤葫蘆南瓜湯

Compare to the non-roasted version, roasted butternut squash instead brings a tremendous different in the flavour.  The caramelized s...