Showing posts with label Chinese food. Show all posts

Tuesday, March 31, 2020

Mao Melon with Pork and Shiitake 冬菇毛瓜釀豬肉


It is a dish that is very easy to make but looks very impressive. My mom likes to make it when we have guest to come over. You can substitute the shiitake with shrimp or dried tangerine peel. Both are very delicious.

INGREDIENTS:
2 Mao Melon
200 gram Minced Pork
5 Shiitake Mushrooms

MARINADE:
3 tablespoons Soy Sauce
1 tablespoon Chinese Rice Wine
1 tablespoon Sugar
1/3 teaspoon White Pepper Powder
1 tablespoon Vegetable Oil

SAUCE:
3 tablespoons Soy Sauce
1 tablespoon Water + 1/2 teaspoon Cornstarch

DIRECTION:
1. Submerge the shiitake mushrooms in the water until they are soften; cut the mushrooms into dices. Preserve the water.

2. Peel the mao melon, cut it into rounds. Each about 2 cm into height. Spoon out the seeds in the middle. Set aside.

3. In a mixing bowl, combine minced pork, diced mushrooms, and the marinade. Mix well. Divide the pork into equal portions, and fill them into each of Mao melon.

4. Place all the Mao melon carefully into a wok. Fill the wok with water that is half way up the Mao melon. Add say sauce, sugar, and the preserved shiitake soaking water. Put the lid on. Cook the Mao melon over high heat for 15 minutes. Transfer the melon to the serving plate. Preserve the sauce.

5. Mix the cornstarch with two tablespoons of the water. Stir the mixture into the preserved sauce in the wok. Cook it over high heat until the sauce is thicken. Pour it over the melon. Serve the dish with steamed rice.


Chinese Lemon Chicken 西檸軟雞


INGREDIENTS:
1-2 Chicken Thighs or Chicken Breast (I used chicken breast)
2 tablespoons Soy Sauce
1/4 teaspoons White Pepper Powder
1/4 cup Flour

SAUCE:
1 Lemon, juiced
1/8 teaspoon Turmeric Powder
1.5 tablespoons Cornstarch
4 tablespoons Sugar
1/3 cup Water 

DIRECTION:
1. Cut a few lines on each chicken thigh to prevent it cruel up during cooking.

2. In a bowl, add chicken, white pepper and soy sauce; mix well. Let it marinate for about 15 minutes.

3. Add the flour on a plate. Coat both side of each chicken thigh with flour.

4. Heat up 1/4 cup vegetable oil over high heat. Pan-fry the chicken until the skin is crispy, about 8 minutes. Turn the chicken over, and fry the other side for another 8 minutes. Transfer the chicken to the serving plate. Cut it into bite size.


5. In a same pan, add the sauce ingredients. With high heat, cook until the sauce is thicken and pour it over the chicken. Serve the chicken with steamed rice.


Saturday, February 29, 2020

Steamed Pork Neck with Preserved Mustard on Tofu | 梅菜蒸豬頸肉豆腐


Other than pig feet, pork neck is my favourite. It has enough chew on yet is tender and juicy. It is the best part of a pig, if you ask me.

In this dish, the tofu on the bottom will absorb the sweet and savoury marinade and form its own seasoning. Which makes the tofu tastes irresistible as the pork atop. One thing to note is that the preserved mustard green is always very sandy and salty, so soaking it in water for twenty minutes is necessary, to get rid of the sand between leaves and the overly saltiness.

I hope you will enjoy this recipe.


INGREDIENTS:
1 block Soft Tofu, drained
2 stalks Preserved Mustard Green
200 gram Pork Neck

MARINADE:
2 tablespoons Soy Sauce
2 tablespoons Chinese Cooking Rice Wine
1 tablespoon Sugar
1 tablespoon Ground White Pepper

DIRECTION:
1. Soak the preserved mustard green in cold water for 20 minutes. Rinse off the sand and squeeze out the water. Cut it into small pieces.

2. Slice the pork neck into 1/2 cm pieces.

3. In a mixing bowl, add pork neck, mustard green, and the marinade; mix well and leave it marinate for about 20 minutes.

4. In a plate, lay the tofu. Top it with the pork neck mixture.  Cover the plate with a piece of foil. Steam it in a pre-heated steamer for about 20 minutes over high heat. Serve it with steamed rice. 


Friday, February 28, 2020

Stir-fried Tomato Egg |蕃茄炒蛋


It was one of the very first dish I learned to cook when I was a child. Back then my parents both worked full time and many nights we needed to cook for ourselves. Leaving children alone at home was so common that people wouldn't even be wary about it. It was the time, I had a lot of opportunities to experiment in my childhood kitchen.

Although I am the middle child, I was always the person in charge of the kitchen. The simple reason was that my sister'd rather occupied with things more interested her than cooking; she was pretty happy when I offered to cook. And my brother was basically just too young to be in the kitchen.

Very soon, I discovered that I could use the rice cooker to make many things other than cooking steamed rice - scramble egg, fry luncheon meat, noodle soup. So I'd never bothered to pull out my mom's big, heavy wok onto the stove. That rice cooker lasted only for a summer. Many years later, I still remember my mom's angry face when she was pointing the scorched egg and the scraped bottom of the rice cooker at us. 

I don't use rice cooker to make tomato egg now. Just like my mom, I use a wok or a pan. However, this sweet memory always steeps into my head whenever I cook this dish. The story belongs to this dish, and I always believe that a lovely dish must have a lovely story.

Hope you enjoy this recipe.


INGREDIENTS:
3 Tomatoes, big
6 Eggs, large
1 tablespoon Chinese Cooking Rice Wine
1/3 teaspoon Salt
2 tablespoons Vegetable Oil
Scallion, thinly sliced (optional)

材料:
3 隻  蕃茄,大
6 隻  雞蛋,大
1 湯匙  米酒
1/3 茶匙  鹽
2 湯匙  菜油
蔥,切幼絲 (隨意)

DIRECTIONS 做法:
1. Cut the tomatoes into wedges.  In a bowl, whisk eggs, rice wine, and salt together.

2. Heat up vegetable oil over medium-high heat.  Add tomatoes and fry them until they are slightly softened; about 2 minutes.

1. 蕃茄切瓣。在一只碗內,加入蛋、米酒和鹽;攪打至均勻。

2. 用中大火燒熱菜油。下蕃茄並炒至微軟;若2分鐘。


3. Pour in the egg mixture.  Continue to fry until the egg curds.  Remove the pan from the heat immediately.

3. 倒入蛋汁,繼續炒至其凝結;迅速離火。


4. Sprinkle it with scallion if use.  Serve it with steamed rice.

4. 灑上蔥,配飯享用。


Friday, February 15, 2019

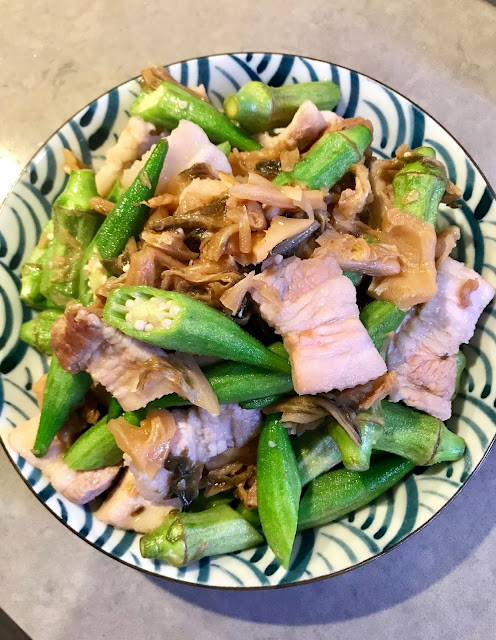
Stir fried Okra and Pork Belly and Sweet Choi Sum Preserved


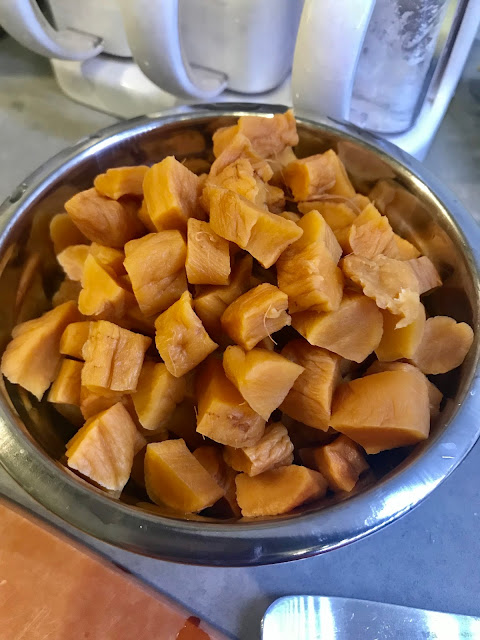
Pork belly is one of our favourite that we enjoy in any form of cooking.  This simple home dish is combined with vegetable and meat, and is greatly flavoured with the preserved choi sum and pork belly.  You can look for the preserved choi sum in Chinese supermarket and it is usually in the pickle and preserves section.


INGREDIENTS:
1 Pork Belly, sliced into 1/2 cm pieces
20 Okra, cut in half diagonally
1 Sweet Preserved Choi Sum
1 tablespoon Chinese Cooking Wine
1 tablespoon Soy Sauce
1/3 teaspoon Salt
1/2 teaspoon Sugar
2 tablespoons Vegetable Oil

DIRECTION:
1. Before cooking, rinse the preserved choi sum under running water to get rid of the sand and sugar.  Then soak it in water for about 20 minutes.  Rinse it carefully again to get rid of the hidden sand.  Roughly cut it into big pieces.

2. Heat up vegetable oil in a pan over high heat.  Add pork belly pieces; stir fry until they turn colour, about 3-5 minutes.  Drizzle cooking wine and allow it to evaporate.

3. Add okra, preserved choi sum, and the rest of the seasoning.  Stir fry for another 5 minutes or until the okra is heated through.  Transfer it to a serving plate.  Serve it with steamed rice.


Sunday, October 21, 2018

Crunchy Preserved Radish and Pork Belly Stir-fry | 菜脯炒豬肉


Preserved radish and pork belly stir fry is absolutely on the very top of my favourite dishes.  My dad knew how much I craved for it so he would cook it all the time.  To balance the saltiness from the preserved radish, my dad would add lots of sugar.  Mom joked with him saying that his best dishes were all composed of sugar and syrup.  Honestly speaking, the generous amount of sugar my dad put in really does the magic to the dish.  It helps thicken the sauce, balance the salt, and flavour the pork.  Our whole family just loves it the way it is.


Back in Hong Kong, we could easily find preserved radish, diced or whole.  However, where we live now, most often we can only find shredded or diced and they don't taste good.  After I tried them a few times, I just gave up and stopped buying them.  Soon, I forgot this dish that reminds me of my childhood..

Until last month when we visited a very old shop in Chinatown.  To our surprise, we found these whole preserved radish.  My husband and I were laughing with joy.

After nearly two years, I finally found some good quality preserved radish to cook this dish again.

 I actually called my dad and asked him for the recipe again so that I can duplicate the flavour.


Crunchy Preserved Radish and Pork Belly Stir-fry
菜脯炒豬肉


INGREDIENTS:
500 gram Pork Belly
4-5 pcs Preserved Radishes, whole
10 tablespoons Sugar
2 tablespoons Vegetable Oil
4 tablespoons Water


材料:
500 克  豬腩肉
4-5 條  菜脯,全條
10 湯匙  糖
2 湯匙  菜油
4 湯匙  水


DIRECTION 做法:
1. Rinse and pat dry the preserved radishes; cut them into small pieces.  Set aside.

1. 菜脯洗淨抹乾;切成小粒。備用。


2. Cut the pork belly into about 1cm thick pieces.

2. 腩肉切成 1cm 厚塊。


3. Heat up vegetable oil in a pan over medium heat.  Add pork belly and stir fry until it turns colour; about 3 minutes.

3. 用中火燒熱菜油。下腩肉;炒其至變色,若3分鐘。


4. Turn the heat to high.  Add preserved radish and continue to stir fry until the radish is fragrant and the pork belly is thoroughly cooked.

4. 把火調至最高。下菜脯,繼續炒至菜脯香氣四溢和腩肉全熟;若5-8分鐘。


If it is too dry, add 3-4 tablespoons of water.

若太乾,可加入3-4湯匙水。


5. Add sugar.  Stir it constantly until the sugar is totally melted and the sauce thickens.  Remove the pan from the heat.

5. 下糖;繼續炒至糖全熔掉和汁變稠。離火。


Enjoy!


Friday, April 20, 2018

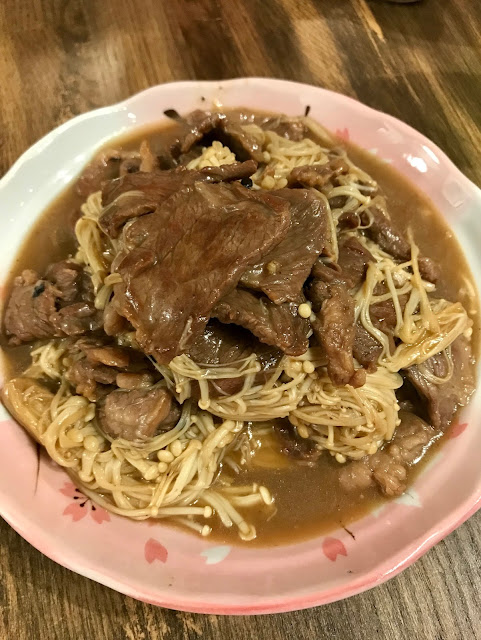
Stir-fried Beef and Enoki Mushroom | 金菇炒牛肉


This stir-fried beef and enoki is a quick and simple recipe.  Except the marinade time, it takes only 10 minutes to cook.  You can always marinade the beef ahead and store it in the fridge and cook it the next day when you come back from work.

Note that I used light soy sauce to marinade the beef instead of salt here.  Salt makes the beef become tough after the marination.

Hope you enjoy this recipe.


Stir-fried Beef and Enoki Mushroom
金菇炒牛肉

INGREDIENTS:
300 gram Beef
2 packs Enoki Mushrooms, divided into small portions
2 Garlic Cloves, peels
4 tablespoons Oyster Sauce
3 tablespoons Vegetable Oil (for frying)
1 tablespoon Cornstarch + 1/4 cup Water

材料:
300 克  牛肉
2 包  金菇,分成小撮
2 瓣  蒜頭,去皮
4 湯匙  蠔油
3 湯匙  菜油
1 湯匙 粟粉 +1/4 杯水


MARINADE:
4 tablespoons Light Soy Sauce
2 tablespoons Chinese Cooking Rice Wine
1 teaspoon Cornstarch
1 tablespoon Sugar

醃料:
4 湯匙  豉油
2 湯匙  米酒
1 茶匙  粟粉
1 湯匙  糖


DIRECTION 做法:
1. Slice the beef into 1/2 cm thick pieces.

1. 牛肉切成1/2cm 厚片。


2. In a mixing bowl, add beef and marinade; mix well.  Let it stand for 20 minutes.

2. 在一只碗內,加入牛肉片和醃料;拌勻。醃約20分鐘。


3. Add vegetable oil and garlic in a pan.  Heat it up over high heat until the garlic is fragrant and turns slightly brown.

3. 在鑊內下油和蒜頭;用大火爆香。


4. Add beef slices.  Quickly stir fry them until they start to turn colour.

4. 下牛肉片;快炒至其開始變色。


5. Add enoki mushroom and oyster sauce and stir fry for about 30 seconds, or until the enoki starts to wilt.

5. 下金菇和蠔油;快炒約30秒,或至金針開始變軟。


6. Stir in the cornstarch water. 

6. 下粟粉水。


7. Continuously stir fry until the enoki is just soft to touch.  Turn off the heat and transfer the beef and enoki to a serving plate immediately.

7. 繼續炒至金針軟身;離火,上碟。

If the sauce is not thicken enough at this point, transfer the beef and enoki to the serving plate first, and then continue to cook the sauce until it reaches the desired consistency.

如汁不夠濃稠,可先把牛肉和金針排盤,再把汁繼續煮至稠身然後淋上面。


8. Delicious to serve with rice or noodles.

8. 配白飯和淨麵一流。

Thanks for stopping by.  I hope you enjoy this recipe.


Saturday, December 30, 2017

Steamed Sweet Milky Custard Egg (Instant Pot version) |鮮奶燉蛋 (壓力煲版)


First snow today!  It is only the second week of November.  It seems like the winter just suddenly arrived.  My son was so excited jumping up and down in the bed.

It was -10 outside and I just found out in this particularly cold morning that my son didn't have his winter garments.  I've been putting jackets, gloves, and hats on my son and he's been forgetting to bring those things home.  He didn't realize how important it was to take care of his things until he found himself with nothing extra to put on to keep him warm.

He was crying because his ears ached in the bitter cold while he waited for the school bus.  We then needed to bring him back home and find him a small old hat under the drawer to wear.  Eventually, he missed the school bus and he got to wear that toddler hat to go to school today.

What a bustling morning!  Sometimes I wonder if most of the parents share the similar experience.

Sweet milky custard egg is a common dessert in Hong Kong many people will choose to to make at home.  My husband and I adore the silky texture of the egg.  You can substitute milk for coconut milk, or use only egg white instead of whole eggs.  If you don't have an instant pot, you can steam it over medium-low heat for 20 minutes.


Steamed Sweet Milky Custard Egg (Instant Pot version)
鮮奶燉蛋 (壓力煲版)


INGREDIENTS:
2 Eggs, large
1 cup Milk, homogenized
4 tablespoons Sugar


DIRECTION:
1. In a bowl, combine eggs and sugar.


2. Whisk until it is well combined.


3. Add milk and whisk well.


4. Pour the milk mixture slowly in a heat-proof container through a tea infuser.  This step is to get rid off the egg membrane.


5. Cover the container with foil tightly.


6. In the instant pot.  Pour in 2 cups of water and place in a low rack.  Carefully put the container on top.


7. Close the venting knob.  Press the "Manual" button once, and then press "Pressure" to adjust the pressure to low.  Press the "-" or "+" button to set the time to 6 minutes.

8. When the cooking process is done, allow the pressure to release naturally until the floating valve goes down.  Remove the container from the instant pot right away.  Serve it immediately.


In Hong Kong, we serve this custard egg both cold or hot.  It depends on the individual's preference.

Thanks for stopping by.  I hope you enjoy this recipe.


Monday, November 6, 2017

Chinese Style Barbeque Prok Belly | 自家製燒腩肉


Chinese Style Barbeque Prok Belly
自家製燒腩肉  

Ingredients:
750 gram  Pork Belly


Marinade for meat:
1 teaspoon Salt
2 teaspoons Sugar
1 teaspoon Ground Anise Seed
1/2 teaspoon Ground Black Pepper


Marinade for Skin:
2 teaspoons Salt
2 teaspoons White Vinegar


材料:
750 克   腩肉


醃料 (肉部份):
1 茶匙   鹽
2 茶匙   糖
1 茶匙   茴香籽,壓碎
1/2 茶匙   黑胡椒碎


醃料 (皮部份):
2 茶匙   鹽
2 茶匙   白醋


DIRECTION:


Wednesday, November 1, 2017

Stir fried Chinese Kale (Kai Lan) and Beef | 芥蘭炒牛肉


Stir fried Chinese Kale and Beef
芥蘭炒牛肉

Ingredients: (yields 4 servings)
14 ounces Chinese Kales
300 gram Beef
10 Garlic Cloves
10 gram Ginger Slices
2 tablespoons Chinese Rice Wine
1 teaspoon Corn Starch
2 tablespoons Water
1 tablespoon Sugar
1/2 teaspoon Salt
1/4 cup Vegetable Oil (for cooking)


Marinade for Beef:
3 tablespoons Oyster Sauce
1 tablespoon Sesame Oil
1.5 tablespoons Sugar
1 Egg


材料:(4人份)
14 安士   芥蘭
300 克   牛肉
10 瓣   蒜頭
10 克   薑片
2 湯匙   米酒
1 茶匙   粟粉
2 湯匙   水
1 湯匙   糖
1/2 茶匙   鹽
1/4 杯   菜油 (炒菜用)


醃牛肉料:
3 湯匙   蠔油
1 湯匙   麻油
1.5 湯匙   糖
1 隻   雞蛋


DIRECTION:


Roasted Butternut Squash Soup | 烤葫蘆南瓜湯

Compare to the non-roasted version, roasted butternut squash instead brings a tremendous different in the flavour.  The caramelized s...